


DIY Outdoor Landscape Lighting
DrawBuildPlay Installing DIY decorative outdoor lighting around your home is simpler than you think. DIY your outdoor landscaping idea and have outdoor lighting today in 6 simple steps for your front yard or back yard. My home setup cost less than $500 all up, compared to professional installers who charge about $2,000 - $3,000 for a similar installation.Plan out your Outdoor Landscape Lighting Design
So, how did I DIY install my Outdoor Landscape Lighting?
Start by planning out what you want your landscape lighting design to entail.
- Where do you want up lights to light up your home?
- What garden features do you want to highlight?
- What obstacles will get in the way of wiring?
- Do you want down lights?
- If so, do you have a way to hide the cable through the gutters/down spouts?
- Where will you install the transformer?
- Where is the exterior outlet?
- Do you plan to have your Outdoor Lighting connected to a timer or Smart Outlet for automatic scheduling and control?
Choosing where to install your landscape lights
Choosing where to install your landscape lights will depend on the look of your home or garden, and what features you want highlighted at night. A good choice is to start with the various walls of your house. Are there features that should be highlighted? Pillars and wall corners are good places to start, and on longer walls you may want to put lights in the middle also. If you have a garden, then pointing the light source at trees will usually look good. If you do this, make sure the front of the tree is lit up (rather than putting the light behind the tree). That way, people looking at your home as they drive past will be able to see the tree/shrub.
Here is the plan I designed for our home.
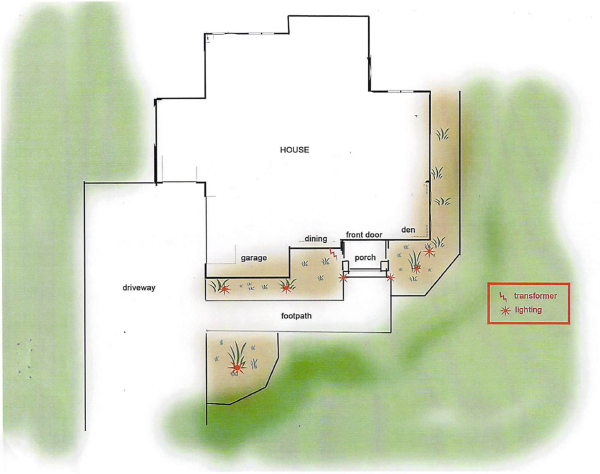
DIY Outdoor Landscape Lighting Plan
Once you have your design planned out, and know what products to use, you might need to get permission from your HOA architectural committee if you are bound by HOA rules.
How to lay wiring under a footpath
Common obstacles you may face while laying down the wiring is footpaths or driveways. Thankfully you won’t have to dig up that concrete. As you can see in my plan above, I needed to cross the footpath in two places. The trick here is to dig a small trench on either side of your footpath. Then place a 1 - 2 inch PVC pipe on your trench as we are going to push it under the foot path to act as our wire conduit. Make sure the PVC pipe is cut down to size (usually the width of your foot path, plus 1-2 feet extra on either side. You should also cover up the hole that will be pushing into the dirt, so that dirt doesn’t get inside the pipe. Using something solid like a bolt works best, and then tape it up using duct tape or painters tape, so it can’t come loose. Next, using a hammer (or other strong solid object), start pounding the other side of your PVC pipe. Every time you hit the pipe, it should go through the dirt a little more. Continue until the pipe emerges on the other side.
Note - if you are like me, you will get to the point where it should be on the other side. But for whatever reason, the pipe may not have gone in perfectly straight. This means the pipe on the other end may have come out deeper into the ground, or angled itself more. If this happens to you, dig around until you find it.
Once you have found the other side of the PVC pipe, remove the bolt covering the hole. You should now have a conduit under your pathway to thread the wiring through.
Exterior Outlets and the Transformer
You may get lucky and have an exterior outlet exactly where you want to place your lights. Otherwise, you may have to go to the side of your house where your HVAC units are. There is usually an outdoor outlet there. If you have no outdoor outlets, you may need to call an electrician to install one.
When I installed my transformer, I put it in the front of the house right where the lights were going to be. There are bushes in front of it so the plan is for it to be hidden behind those bushes as they grow. In hindsight, I think I would have preferred to install my transformer around the side of the house near my HVAC units so that I wouldn’t have the power wire visible by my front door where an outlet is. Oh well, eventually I will move it.
I purchased this Transformer from Amazon. You will need to look at the wattage output of the Transformer, and add the the total watts for all of the bulbs you will be installing. If using halogen bulbs, then the watts add up quickly and you will be limited by what the transformer can handle. LED Bulbs on the other hand are very bright these days and have the warm colors you want. Their power usage is also incredibly low, resulting in many more LED bulbs supported by your Transformer. We use these LED Bulbs in our outdoor lighting.
How to install your outdoor landscape lighting in 6 simple steps
Okay, now you have a plan, you have your Landscape Lights and your Transformer and Low Voltage Outdoor Cable. To install, start by laying the outdoor cabling where it will be. Put each Flood Light where they will be. And put the transformer where it will be. Make sure you have enough wire for this installation, and I recommend keeping lag near each section so you have room to both maneuver the wire as well as to add more lights in the future in between where you are installing now.
- Start with the Transformer.
Get it plugged in and make sure it turns on. Now disconnect it before connecting any lights. - Install the first light by cutting the wire with wire cutters or a sharp knife. You will need to expose the wiring by removing some of the rubber sheathing. Connect the wire to the light, taking note of the + and - terminals.
- Continue the wire to the next location, and repeat until all of your lights are connected. Your wires will also likely come with a waterproof silicon gel and wire nuts which you will apply where you splice and connect the wires. This keeps the setup safe from the water when it rains under the dirt.
- Test. A good piece of advise is after each light is connected and bulb installed, test that it does turn on by reconnecting your transformer and turning it on. This avoids trying to figure out what you did wrong at the end when you have no idea which one has a loose connection, or if the bulb was bad.
- Bury the wire under about 1 - 2 inches of dirt as you install each light. Once complete, put any mulch or pine straw over the top also.
- Positioning. Check out how the lights look at dusk or when it gets dark. Take this time to re position the angle of your lights so they are pointing to the preferred spots. You may also need to move them around by a few inches so things like symmetrical etc.
Smart Home Automation
Now that your outdoor lights are set up and looking beautiful, next is to automate them. You probably don’t want to remember to turn them on in the evening, and off in the morning.
Some transformers will come with a light sensor and/or timer that can be used for scheduling when your lights should be on or off.
I prefer to use the iDevices Outdoor Switch. This lets me control the power state to the transformer, using Apple HomeKit and Siri. It also works with Google Assistant and Amazon Alexa, and doesn’t require a separate hub. As a result, I now have automation called “Evening Lights”, which triggers 30 minutes after sunset. It will turn on my porch and garage lights, along with my garden lights, all via automation. All of the above will turn off later that night so that I’m not burning power into the long hours of the night.
