


DIY Under Cabinet Lighting
DrawBuildPlay Installing lights under kitchen cabinets gives your kitchen an ambience your friends will envy. Install your own gorgeous DIY Under Cabinet Lighting LEDs in your kitchen for less than $30 and in just a few minutes.One of the things we wanted to do when we built our home was to have under cabinet lighting in our kitchen.
How much does it cost to install under cabinet lighting?
During construction, a home builder will typically charge about $200 per light, and with three sections in our kitchen this would have easily cost us $600 - $1000 depending on how much we got. If you install your under-cabinet lights yourself, it is significantly cheaper, and can be installed for about $50.
After researching some ideas, we decided to install wired puck lights ourselves afterwards. I had the builder install power outlets above the cabinets, connected to a wall switch. If you do this, have them install it horizontally so that the outlet is obstructed from view from the ground by the cabinets.
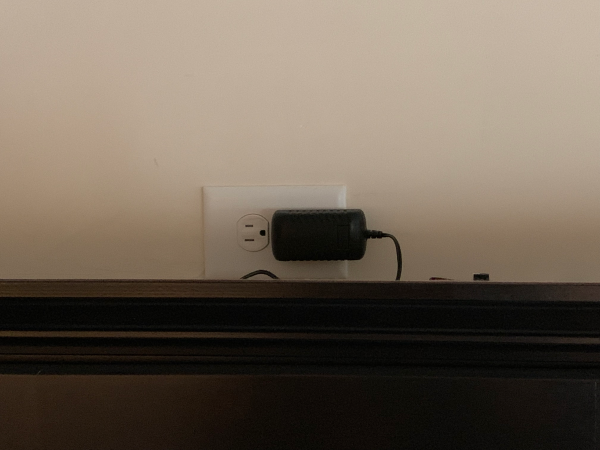
Under Cabinet Lighting Outlet
If you can’t install outlets, look around as you may already have one inside one of your cabinets to power your rangehood or microwave. Alternatively, you can install battery powered puck lights, and not worry about wiring. I didnt want the hassle of replacing batteries and wanted to control them together easily, so went with wired.
DIY UNDER CABINET LIGHTING INSTALLATION
-
Find the location under the cabinets you want to install the light. Dont screw it in yet as we are going to test the location later.
-
Look in between your cabinets. There is usually a small gap between each cupboard, hidden by the framing of the cabinet. This is where we are going to thread the wire.
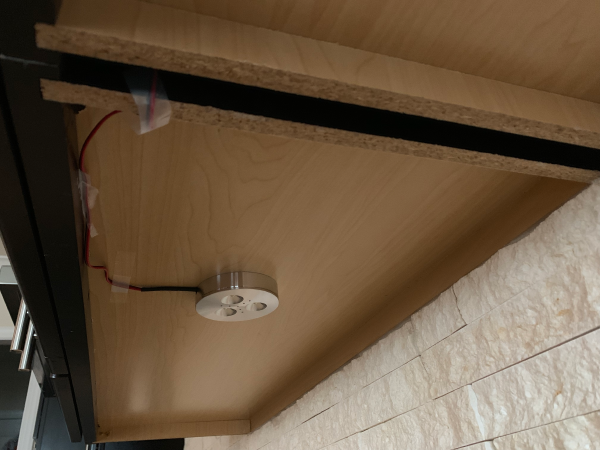
Under Cabinet Lighting Wiring
-
Carefully, climb up and connect the wire (per its instructions) to the wall outlet. You can string it across the top of the cabinets to wherever your wall outlet is located.
-
Turn on the wall switch so that the light is on.
Note, if you dont have a wall switch that powers your outlet, you may want to consider getting a smart plug so that you have the ability to turn it on and off easily. I recommend the iDevices Switch.
-
Check the position you want to place the light. If it looks good, lights up the area you need, and is centered how you want it, then mark the location.
-
Turn off the light.
-
Screw (or attach) the light to the bottom of the cabinet per its instructions.
-
Hide the wiring, so that you cannot see it at eye level when walking around the kitchen. I just used some tape to tuck it behind the lip of the cabinet so that it was not easily visible.
-
Enjoy your under cabinet lighting.
As an added bonus, I replaced my builder provided light switch that controls my under cabinet lights with an iDevices Wall Switch so that I can control it with Apple Homekit, or Google Assistant. Just shout “Hey Siri, Turn on the Kitchen Cabinet Lights.”.


